Tuesday, December 10, 2013

Random walks and predictable trends


The random walk hypothesis suggests that market moves are purely random and what appears to be trends are simply accumulation of sporadic random moves that happen to occur in the same direction for a duration of time.

The idea is that buyers and sellers mostly cancel each other out, and the net difference causes a perturbance in the  price of the underlying.

The random walk hypothesis is pretty absurd since it assumes that the probabilities of buys and sells stay same with price movement. It should be obvious to even the lay person that a stock at $1 can have twice the buying pressure as a stock at $2.

Traders know very well about herd mentality, the rush to join a successful move and abandonment of a spent move. Fear and greed are the true drivers of the market, not randomness. This is true at least for trending markets.

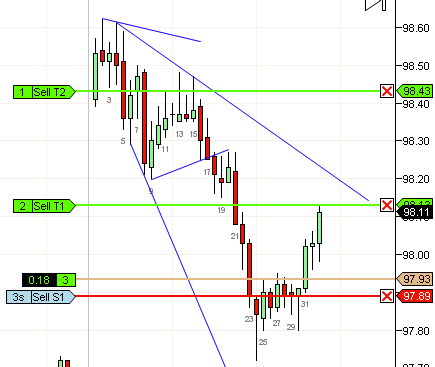
However, when the market is not trending, random movements are perfectly possible. To figure out what movements are random, I ran a simulation where every move went up or down based on probability. When the probability is 50%, the market essentially becomes BW (as in b2-b5). When the probability is slightly imbalanced, we get a sloping channel (b49-59).  In general, if the bodies are sloping, its a slightly imbalanced channel. In either case, they are traded the same way. You wait for a trend to break (b9 was LL-LH-LL) and then take the first pullback (b15 or a better bar at b17) or wait for the breakout to reverse and take the reversal (b24 or the next HL, b30)

Taking the correct bar with the right stop is tricky and deserves its won post but as you can see on this day, its possible with some practice. Moves from randomness often lead to sharp trend attempts that often reverse or otherwise get arrested, so its important to take profits conservatively.


Monday, December 2, 2013

Smaller stops, larger gains


After an in-depth survey of my trading results, I discovered that my best trades have the least maximum adverse excursion (MAE) or pullback. Many were under 5t. Therefore, I embarked on an investigation to figure out if it was actually possible to trade on a 5t stop if I chose my trades very carefully. The trick was to find a way to objectively measure the effectiveness of such a small stop and whether a larger stop (10t) would succeed on the exact trade if a 5t stop would fail. One way to do this was to have two stops, one at 5t and the other at 10t. And then measure fraction of trades that were successful on 5t stops.

The plan was to have two stops on entry at 5t for two contracts and 10t control for an additional contract. Once the price moves past the entry bar, all stops could be tightened to 5t.

The three possible results are:

  • both stops taken out: Trade was a total failure
  • 5t stop taken out, trade eventually fills at least 20t: Trade was a partial success
  • neither stops are taken out: Trade was total success


Preliminary results suggest that most trades that are stopped out with a 5t stop would also be stopped out with a 10t stop.

At this point results are preliminary and I do not believe I have sufficient data to draw a broad conclusion in all market conditions.

However, I do believe that for people whose success rate is under 60% or so, the benefits of smaller losses from tighter stops outweighs the small number of gains lost from partial failures. A 20t gain vs a 5t stop is a 4x profit factor and can greatly steepen your profit curve.


Thursday, November 28, 2013

Choppy waters


Success in trading (or investing or gambling or any kind of speculation for that matter) is primarily the mastery of balancing risk versus reward against probability of win. A buyer of a lottery ticket makes a rational choice of wagering a nearly zero-impact amount on a potential windfall of low probability. A casino gambler is essentially in it for the thrill and may choose to do something similar (bet on number 6 on roulette or bet on red) to maximize gains on a low probability but much more realistic than the lottery buyer.

A trader should aim to only trade when a win far outperforms the losing trade by probability. This means that if on an average if you have a 50% win rate, your wins have to be at least larger than your losses by just a bit. The larger your wins compared to your losses, the steeper your account growth. You should typically only trade when your wins are expected to be twice as large as your losses. This will enable you to be a break-even trader with 33% win rate.

Your win rate depends on your skill of course, but more importantly, it depends on how the price action is unfolding. In a very strong trend, taking with-trend trades is a good win/loss ratio regardless of the probability of success. This is why sometimes in a strong trend, its ok to re-enter right after you were stopped out (as long as the trade was in the direction of the trend).

The worst time to trade is when your win/loss ratio is poor even with high probability of success. Today's price action reflects such a day. When the bars are small and doji-ish and the swings are small, its unlikely you will make huge profits on runaway trends. Even your scalps may fail despite the patterns you expected playing out as predicted.

Therefore the first lesson in profitability is to be able to simply recognize chop and sit out.


Friday, November 1, 2013

Quick breakeven exit strategy for experimental trades


When you start out trading your primary concern should simply be avoiding total destruction of your account. This is a hard goal to achieve, but one of the ways many traders approach this is to quickly move to breakeven when possible. This means that you give up potential profits in exchange for lower risk. All experimental trades (where you are trading to collect data rather than make money) are also traded in the same manner.

There are many breakeven strategies and this the one I'm currently trying:

  • Trade 3 contracts with -10t stop
  • Exit the first one at +10t
  • On fill, tighten stop to -5t
  • Exit second contract at 20t and tighten stop to entry price 
  • Exit last contract at 40t (or swing last contract)
Your varying degrees of success are:
  1. Trade fails: -30t
  2. First target filled but pullback is 5t or more: 0t
  3. Second target is filled followed by 0t stop taken out: 30t
  4. Third target is filled: 70t
Lets assume that the chances of the outcomes are as follows
  1. Half your trades will breakeven: -0t: 50% 
  2. Of the remaining, half will be total losers: -30t: 25%
  3. Of the remaining, half will work for profit: 30t: 12.5%
  4. Remainder: 70t: 12.5%
Your net average chances of a win are about 5t per trade, barely enough to cover commissions. However, you never really had hopes of winning trading a different exit strategy anyway, so this approach may work better simply by reducing the risk of losing from 50% to 25%. Note that you are now able to trade breakeven with only 25% win rate, which is a significant lifeline for a novice trader.


Wednesday, October 16, 2013

Targets on multiple contracts


I've been experimenting with various exit strategies and my current strategy is the following:

When trading one contract, exit at 2x risk (for CL 10t stop, 20t target)

When trading two contracts, exit one at 2x risk, one at 5x risk (10t stop, 20t, 50t targets)

When trading three contracts, exit two contracts at 2x risk, one at 5x risk (10t stop, 2x 20t, 50t targets)

When trading any other even number of contracts, divide in half and trade like its two contracts.

When trading any other odd number of contracts, exit half + one contract at 2x risk, half - one contract at 5x risk. (i.e. for 5c, exit 3c at 20t, 2t at 50t)

The 5x risk above is a swing target and must be adjusted according to market action. For example, you may need to make the target modest if the day looks like it will be small or let it run if the market looks like it could run all day.

Note that Ninjatrader summary of trades uses the first exit to denote exit time and your swing exit can only be seen if you uncheck "Group Trades by ATM strategy". Therefore to see your swing exit, you need to parse through a longer table as shown below:


Friday, October 11, 2013

Trendlines and TCLs as targets


Just as a TL indicates favorable locations for entry, TCL typically indicates favorable location for exit. This is because price typically moves in channels and traders enter near one end of the channel and exit on the other.

When the channel is steep and narrow, the market is typically trending and trading is feasible only in one direction.

When the channel is wide and not very steep, it becomes feasible to trade in both directions.

Today's trades show two setups where exits are made at TL and TCL.

Trade #2 was a short which reacted at the TL and forced an early exit.

Trade #3 was a long which poked the TCL and was a favorable exit. A TCL violation and a large bar are both signs to exit since a potential extended pullback is likely to follow. The sidebar image shows an exit order placed at the TCL.

Any shorts at b22 should look to exit near the test of the TL (near b27).

When a TL cannot hold the price, you may see a breakout well beyond the TL or may react very weakly. Such an event is a trend break and you should no longer trade in the direction of the trend. Continuation trades are typically such breakouts beyond the nacent counter trend in a pullback (b7,10).

Friday, October 4, 2013

Shallow and deep pullbacks with trendlines


I have often advised new traders to only trade deep pullbacks or obvious pokes into the trendline. This is usually very good advice on most days. The only exceptions are possibly hard trend days, where you can really take any small bar near or touching the trendline and soft-trend days, when you can take any fL2.

Trade #1 illustrates a shallow pullback. The price barely pokes beyond the trendline. The signal bar b6 is also a poor bar and in the middle of a BW. However, 2L 1PB when successful can go quite a while, so I often take it despite it being a lower probability trade.

Trade #2 on the other hand illustrates a deeper pullback. b10 clearly has poked well beyond the TL and therefore is more likely to give an entry bar (b12) that does not take out a stop.

Trade #3 is an fBO trade. Note the smaller size since its always better to sell the next pullback after the fBO succeeds

Trade #4 is a reasonably deep pullback since b27 poked many ticks beyond the TL and also gave an entry bar b28 that did not take out any stops.

Trendlines enable entries and also point out obvious exits. For example, the W down to b13 violated the TCL b2,8 and the the sell from b27 stopped at the trendline from LOD of prior day.

With discipline, simply entering on every deep poke of the trendline should be a viable trading strategy.

Tuesday, August 27, 2013

Sizing


A common risk reduction technique is to minimize size on less desirable odds and increase size on desirable odds.

For instance, if you had nearly 100% certainty that a certain outcome would occur, it makes sense to bet everything you have on it. In fact, you should sell the farm, borrow money and bet it all on the 100% certain bet. On the other hand if you have a 0% certainty that the same outcome would occur, you would do the same, except bet the opposite way, i.e., that the said outcome wouldn't occur.

From these extremes, it should be obvious that the hardest bet is when the probability is exactly 50%. Its effectively a coin-toss and if you repeat it long enough, you should break even. However, you could have long stretches of wins and losses and therefore you would need to bet smaller amounts. In fact, the right thing to do here is to bet the smallest possible size since your net outcome is the same regardless of the size of the bet but the damage to your account is smaller if you bet the absolute minimum. This makes the bet curve shaped like the letter U with max bets at 0% probability, falling sharply to near zero at 50% and rising sharply at 100% probability.

Placing trades is similar to the above scenario with certain differences. First of all, you can actually sit out and not bet in the mid-probability, which is most of the time in the market. Secondly, there is a transaction cost for every bet and therefore a you are likely to go underwater rapidly if you trade anywhere except a high probability zone simply from the costs. The new shape is like a strike-through letter U. Lastly, to bet something would not happen you would need to do something other than what we do here, such as write options.

Since costs are a significant amount in a high transaction account, simply sitting out low probability trades can push you from a losing account into a winning account.

When you are not certain whether a trade is high or low probability, it makes sense to trade a smaller size. For example, on this day, I placed full sized trades for #1 and #5 which earned handsome profits and smaller sizes of #2,#3 and #4, which effectively were a wash.

Wednesday, August 14, 2013

Multi-targets


Optimizing exits is something I've been working on for a while and its one of the hardest things to do in trading. There is a conflict between a clean exit and catching a large run.

For example, in today's first trade, I had a MFE of 1.2 and the second had an MFE of 1.5 for three contracts. Catching the top tick is magical and no sane trader should aspire to do it every time. However, if I had chosen to exit all three contracts on both trades today, my take would be .20*6 = 1.2

Another potential optimization is to exit on the close or beyond the first bar that does not have a strong close. In today's example, that would net me .90 + 1.8 = 2.7

Translated to per contract, it would take my winning from just under .30/contract to about .90/contract almost 3x better.

However, this is a reasonable thing to do only when you expect a trading range type behavior. On days when a trend is obvious -- which is quite hard before it sets up -- it may be better to hold on for the large move.

In the coming days you will see me move to a hybrid exit instead of fixed exits for 2nd and 3rd contract.

Friday, August 9, 2013

Trading without ema


I'm currently experimenting trading without an ema. My initial goal is to verify that my accuracy is no worse than trading without it.

CL usually reacts at first contact with ema, but my reasons for eliminating ema are foundational to the concept of price action.

First of all, ema is a computed value, and as such is subject to all the issues of other indicators. Secondly, there are many popular kinds of moving averages at every interval and timeframe. They all would be at a different value and a reaction on contact could simply be a popularity contest.

A trendline on the other hand is always the same at every timeframe. The trendline could be steeper on a higher timeframe or flatter on a lower time frame but eventually, contact with a trendline is always the same and its value as support has more credibility since you would expect every trendline trader to jump in at the same time, while ema traders are likely to jump in at different times.

My hypothesis currently under test is that setups that bounce off a trendline are more likely to succeed without a large pullback and pullbacks on such setups indicate early failure.

Wednesday, August 7, 2013

Single Trade Rule: A cure for overtrading


The promise of nearly unlimited freedom of being a trader, both in the way you work and your overall lifestyle attracts people of poor discipline to trading.

Discipline is the ability to obey your own rules by sacrificing short term temptations in favor of long term goals.

If your technique and market knowledge is poor, you should still be a break-even trader. A losing trader usually has discipline problems or is engaged in self-destructive behavior such as chronic counter-trend trading, random entries, chasing unexpected moves, reversing and re-entering on every loss and so on.

If you have a modicum of discipline, you should be able to limit your losses and turn the corner using the two strikes principle.

If you are unable to stick to even that, I suggest you try the single trade rule. Any day, you will take exactly one trade, win or lose. The purpose of this system is to slow you down and remove the urgency and unrest when sitting out and reactive behavior on loss (or even wins) that causes so much destruction.

A few months of the single trade system should make you more cautious and more tolerant emotionally to loss. More importantly, this should protect your account from rapid evaporation.

Friday, August 2, 2013

Patience and Agility


One of the hardest things to come to grips with trading is that you need to hone two conflicting instincts. The first and foremost is patience. You should be able to wait patiently for a setup that you are confident is a high probability setup. However, when the setup does show up, you need to jump on it and act without hesitation.

Impatience and unrest when sitting out is an account killer and many new traders fall for this trap and blow their accounts. If you feel an urge to get back into the market right after the moment you are stopped out, you are afflicted by this trading ailment.

When traders see large bars such as b1,b11 or b20 they get anxious about missing out on a potentially huge move. They suspect a potentially large drop or huge rally that will net hundreds of ticks which they have been waiting for all their lives and are compelled to act. Subconsciously, they have made a choice that losing one more trade among the thousands of lost trades is a small risk compared to the huge gain they are going to have if they chase this big bar.

Unfortunately, huge rallies and dramatic crashes are rare. But when they do happen, it leaves a strong impression in our memories simply due to the intensity of such moments. Our instincts are tuned to prepare for such moments and we act accordingly.

To deal with impatience, develop a set of checkmarks that you need before entering a trade. Such a test needs to be simple enough that you can evaluate it in a moment and anticipate such a setup as it develops. If you have to process a lot of information at the second a bar closes, the urgency will force you into errors.

A simple three pronged test I use is the following: The trade should occur with support. For example, trade #1 today was at the low of the prior day and is a potential place of reversal. Trade #2 was the first touch of ema and at a trendline. Trendlines, ema and the high and the low of the prior day are very strong supports for your trade.

The second is a two or three legged move: Both trade #1 and #2 were two or possibly three legged move to support.

The last is a decent signal bar. While strong closes with a body at least half the bar make excellent signal bars, occasionally you can relax this constraint depending on experience. Note that the weaker the bar, the worse the pullback and the larger the required stop.

As the price action unwinds, you would keep track of these three variables and when the market sets up, you would already have made the decision before the bar closes. This ensures that your decision has been made with care and you are not forced to make a split-second decision.

At this point, you should act immediately and without hesitation. You should not be worried about taking a loss or panicking if the trade moves against you. Some amount of losing trades are normal and you should welcome them.

Once you enter, hold your ground and do not exit early. The only reason to adjust your targets are if the move is much weaker than you expect. For example, I expected a strong entry bar for trade #1, when it turned out to be weak and was followed by another weak bar, a breakeven exit is ok to take.

Thursday, May 9, 2013

The key to confidence


Many traders are unsure whether to buy or sell. Typically, this presents itself as the trader reversing their position with every loss. When they encounter a market such as the few bars on today's open, they may find themselves getting into may trades and getting chopped up.

Such traders have very little confidence in their ability to judge the overall direction of the market. The ability to recognize if the market is trending or simply in a chop is the basis of being profitable. The market provides different options based on whether its trending.

Therefore the first skill a trader needs to work on is the ability to read market direction. This also includes the ability to know if there is no real direction. The simplest way to get there is to always draw a trendline. When the price moves well beyond your trendline, you should assume the trend has ended but until then, trade only in the trend direction.

Over time, trading in only one direction improves sense of direction. You may then consider adding obvious reversals such as the three push move and obvious TCL OS at b26. When you have confidence in your direction, you will be able to re-enter in the same direction (#3) even when your original entry failed (#2)

Do not be overconfident on initial success. A sense of direction is primary but not a complete set of skills. Entering correctly, estimating stop size, and an ensemble of many other skills make a complete trader. Also be wary of very strong and very weak trends that will test your ability to trade profitably.

Wednesday, May 8, 2013

Location: Trading a trendline


The primary precondition to trade trendline is an established trend. Two higher highs followed by two higher lows is a bull trend. After the open, we had the first higher high at b6 and the second higher high at b10. b11 was the second higher low. There are some optimizations that try to detect the trend earlier, but 2 HH/HL is a definitive bull trend that anyone can recognize.

At this point, you can take a long trade and trade it until the trend breaks (by the strong move down from b14 to b21.)

If the trend break is caused by a reversal such as the three push W and TCL OS to b13, then you should consider taking trades in the new direction. If there was no clear reversal, the trend has simply terminated and you should not take any more trades until a breakout and new trend is established.

Once you see a reversal you can simply wait for a signal bar to form after poking the trendline. A conservative trader may choose to wait for two LL and two LH (b15,17,21,24) and then take every signal bar that pokes the trendline. Once the signal bar triggers, the trendline shifts a bit to give a shallower trendline.

If you do nothing else but trade the trendline with discipline, you should find a better than 50% success rate. Note that the steeper the trendline, the better your chances of success. If the trendline is too shallow, your chances of stop-out are high even though the market may ultimately go your way.

Thursday, May 2, 2013

Trendline Discipline


The single most requirement for successful trading is discipline: the ability to stick to your own rules. Most people are impulsive and are easily pushed emotionally one way or another. Take stock of your own history. Do you rush to the office kitchen when someone announces free cookies or buy things on impulse? Check out the hot girl while at work well knowing that its detrimental to your career? If so, you are likely to be a poor trader.

Good trading requires you to be convinced that your rules matter and following them has long term benefits far outweighing the short-term emotional pleasures of breaking them. Once you realize this, then it becomes a matter of training yourself to stick to your rules.

Consistent profit comes from consistent behavior.

Once your profitability is consistent, you can work on improving it. Even a consistent loss is better than whipsawing between profit and loss since an introspective trader can figure out what is making them lose and apply corrections.

One of the simplest rules of trading that you can practice discipline on is trendline discipline. The idea is that you always trade with support behind your trade and even when other supports such as the ema are far away, a trendline is usually easy to draw. The best trades will take off from trendlines  or will pullback to trendlines. The only exception to this rule is a W such as b16 opening wedge or b55 WP.

Even if you don't follow any other rule, trading only after a trendline is tested (preferably poked through, not just tagged) is likely to improve your results.

Monday, April 8, 2013

Bar


Tick scalpers cause prices to pop up and down a few ticks and their net impact on the direction of the market is neutral. Generally speaking, tick traders will exit their positions when the market moves in their favor a few ticks. Other tick traders expect this and will fade such moves causing any move to pullback just a bit. These two groups of traders are tick chasers and tick faders respectively.

When the market activity is dominated by the above kinds of traders, bars tend to have small bodies and have tails on both ends (dojis). When many successive bars are dojis, any trend trading is likely to be lower probability. Occasionally, the move out of this area is strong enough to result in a trend in either direction.

When traders take positions and stand their ground and tick traders are unable to create tails at the ends of the bars, the likelihood of a strong entry bar and a sustained move are higher. Therefore bars like b12 and b9 are likely to be winning setups, i.e., respect stops and go at least as far as the signal bar before.

A strong close therefore is a very good indicator of a good with-trend setup given the market is at a good location and has a tradable pattern.

Note the exceptions to this rule: 

  • A large overlap (b22,23) is likely to invite faders. You should treat the OL like a TR and take a BP or fBO of the overlap
  • Inside bars, especially large inside bars are also overlaps and their breakout is likely to fail or at least require a large stop. Small inside bars (smaller than your stop) are usually OK. Inside bars that setup a fade of a much larger overlap are often OK (b9, b24)
  • When the market enters a channel (b37-66), all signal bars are likely to be poor but the move can be protracted.


Thursday, April 4, 2013

Pattern


One of the most interesting problems in day trading is early determination of a trend. An early determination is a decision before there are obvious HH and HL or LL and LH. One simple way to address this is to state that any sustained move from the open is a trend (b1-4) and any sustained move against such an opening trend (b5-8) is a possibly a first reversal (1Rev). Any move that is not sustained is simply a 1PB. The balance between a 1Rev and a deep 1PB is subtle. In the absence of a 3 push move and reversal, I generally err on the side of a 1PB (with some notable exceptions).

Once you have a trend, even if its simply an early determination, you can look for with-trend trades.

Among the with-trend setups, I'm most liberal about the first pullback (#1, #4). If the pullback is deep (#1) or has a strong signal bar (#4), I will often take it since it can lead to gains far larger than the risk. A first pullback made of a one leg or poor bar is not a higher probability trade, but when it does succeed, the gains can be large. Sometimes, a failed deep 1PB in the old direction is a 1PB in the new direction (#2,#3). Usually, I prefer to skip the reversal itself (b14) and take the 1PB after it (#4).

A first move against the current trend (#5,6) is likely to require you to exit on the entry bar, regardless of how good the signal bar may be.

Multi-leg pullbacks such as b54 have the highest probability of a strong entry bar and least adverse excursion after entry. When a multi-leg move is basically a micro-channel (#9), chances of a failed first attempt to break the channel are high.

Wednesday, April 3, 2013

Location


In an earlier post, I outlined how you could trade both directions as long as you exit on the close of the entry bar. So the question becomes, why would I ever want to only trade with-trend? Why do I insist on taking only a few good trades and let most trades go by?

What is the point in taking only a small number of trades? Isn't it better to also add those little trades to pad my profit? Won't all those small trades add up?

Today's action illustrates why all those little trades do little or nothing to your bottom line for most traders. For example, today I added five counter-trend trades at reasonable setups:

#2: Multi-leg fBO with strong signal bar
#7: TCL OS
#10: Strong signal bar
#11: small trend entry bar (occasionally these are followed by BO bar)
#12 possible W

Even with the express intention of exiting on the entry bar, three of the five trades were losers.

In contrast, only one with-trend trade, #3 was a loser. This was a news related experimental trade. Trade #9 was a scratch and was an accident.

The important take away here is that if I only took #1 and #5, my cumulative profit would have been larger.

A second observation is that the longer you trade on a given day, the worse your performance gets. For example, My peak profit was after trade #6. I gained nothing by trading for an additional hour.

So what's special about #1 and #5? They were clearly at the trendline. Their superior location is obvious even without drawing an explicit trendline.

Monday, April 1, 2013

Building blocks


Price action trading has so many angles and components that it can be overwhelming. An average trader is unlikely to be able to recall every single aspect of price action and make the correct call most of the time. In contrast to simpler indicator based approach where everything boils down to a buy/sell, price action concepts reflect the complexity of the market and the trader needs to weigh opposing readings and make the right call.

To be able to absorb and build up one's knowledge and expertise and then practice and apply it in daily trading is no simple matter. To do it with every single bit of price action knowledge is next to impossible.

I believe that the layers of knowledge and expertise need to be built up one by one. The first and foremost is directional correctness. The next is the right entry and the last is a target estimate.

Directional Correctness: A new trader should trade not with profit in mind but with the desire to hone his directional correctness. If a trader is able to take trades that eventually move in the direction of your trade, then they could theoretically be profitable with larger stops. A simple way to do this is to not bet on any reversal attempts. Instead let the reversal attempt actually succeed (take out a swing point) and then take the next pullback. With-trend entries enable directional correctness. The market needs to be trending  (higher highs/lows or lower lows/highs) and not in a chop. A simple way to ensure that you are entering with-trend is to always draw a trendline and ensure there has never been a trendline break (a sustained move beyond the trendline) or the trend has otherwise terminated (no HH/HL or LL/LH).

The right entry: A second requirement is to only enter at support. A test of the trendline or ema or HLC of the prior day are usually good choices for entry. A good location ensures that many more traders enter with you increasing the probability of success.  Two or three legged pullbacks have higher probability than a one legged pullback. The earlier the pullback, the weaker it can be, i.e., the first pullback can be one-legged with a poor bar if its deep. The second and subsequent pullbacks should be two legs and deep and should preferably have a good signal bar. Do not be tempted by one-legged shallow pullbacks after the first pullback. They are likely to fail and give a two-legged deep pullback. If you find that you are often stopped out and the price eventually moves in your direction, you need to develop patience and let the market develop better entries. Once you have mastered this for normal trends, you can make adjustment for hard and soft-trends. You would still need to be cautious after an extended move or third pushes since a retrace would need to be two or three legs.

A good way to distill the points above is to reduce them to location, pattern and bar. A good location is a pullback to a support in a trend move. A good pattern is a deep pullback, preferably two or three legged. A good bar is a strong close, non-overlapped signal bar (with adjustments for 2BR, oio, etc., where you would treat the entire pattern as one bar).

Estimating targets: Once you have mastered directional correctness and are generally successful taking the right entries, you can work on maximizing your profits. The most obvious choices are measured moves of a trading range and overshoot of TCL on third push. You should also look to exit near the recent extreme once a trend is broken.

Remember the order of mastery and take them up one by one. Until you have mastered directional correctness, your mind does not have the bandwidth to absorb the intricacies of the right pattern and entry. Until you can confidently take the right entry without fear of being stopped out, you will have no conviction to hold until your estimated target.

Once you have all the three, you have developed a framework into which other observations of the market fall naturally into place. After this point, your trading style develops sophistication and absorbs information from the market and other participants naturally.

Saturday, March 23, 2013

The first few weeks


Beginner's discipline

One of the enduring problems of a trader is the laxity in discipline that creeps in with success. My initial success rate of over 65% has dropped to below 50%. Some of this can be attributed to necessary experimentation, but not all of it. At least half should be attributed to overconfidence and a misplaced self-assurance that I can overcome any losses easily. In general, I try to design my experiments such that losses are minimal. However, for many goals such as figuring out where to fade an overlap, there is no practical way to do it.

Many of the big down days were wednesdays, trying to figure out how to extract maximum value from news events. I have given this up as an unreasonable and expensive goal.

My current goal is to redesign experiments such that even with losing trades, I wont have any losing days.


Plateau

Its possible that I have hit a plateau. The big losing week is especially bothersome and has reminded me to be more disciplined. I need to take care not to let my uptrend in the equity curve turn into a down-trend.

I will post with increasing frequency in the coming days now that I have a baseline to compare my performance.

Friday, March 22, 2013

Alternative RSS Reader

As many of you are aware, google is shutting down its blog reader. An alternative reader similar to Google Reader is Old Reader. You can use it to read this (or any other) blog. You can also export your google reader settings and import it in old reader.

Sunday, March 10, 2013

Late 12-2010 and 01-2011 posts restored

My trading style has evolved over the time I have maintained this blog and have leaned towards new setups and new ways of seeing the market. However, the early articles are still relevant and extremely educational. These articles had lost their images due to deletion on the server.

Thanks to the contribution from readers worldwide, most of the early articles have been restored from images submitted by various readers.

I have regenerated images for posts dated 2011-01-10 to 2011-01-14. Those charts do not have their original markings. If anyone has these charts, please submit them for restoration.

Thanks to everyone for their continuing support. I hope to be able to continue posting with regularity and end the dearth of posts over the last several months.

Update: All images have been restored. Thanks to my readers.

Thursday, March 7, 2013

Targets and turning points


A large first bar is usually an opening range, especially if it has large tails on both ends. Any breakout beyond it is likely to fail (b2, b5) and test the other end of the trading range. On tight trading days, price could bounce between two ends for the entire trading session but occasionally, a breakout will succeed and such breakouts usually lead to a measured move of the opening range (b14).

Trading the fBO of the opening range should be attempted with caution since the profit potential, defined by the range size needs to be large enough to justify the risk. A weak bar such as b2 or b7 are not very high probability entries and your chances of a successful trade are lower compared to a strong signal bar for an fBO setup.

A successful BO that leads to a measured move may turn and retrace most of the breakout (b24) or even most or all of the opening range (b49). Sometimes breakouts continue to trend up for the rest of the session, but a strong prior move (b3-5) suggest a turn at the measured move is likely.

Therefore targets such as the other end of the range such as b1L for b2 short, b2H for b7 long and MM target of b1 at b14H are potential turning points and you should watch carefully for signal bars. A strong signal(b15) bar may mean good chances of a reversal or retrace.

Monday, March 4, 2013

Structure before pattern


A tick or bar scalper only needs to find setups that move at least as many ticks as his stop. A swing trader's job is harder, since he has to correctly identify setups with a high probability of a large move. But the advantage of the swing trader is that he comes out ahead even with a 50% win rate.

One of the classic big move scenarios is a failure. A failure of a W trade (#1) sets up a measured move of the size of the W in the opposing direction. If the W setup was weak to begin with (b19,20), this strengthens the failure trade (#2).

Failures usually have a second leg and after the move down to b26, you should never take a reversal until a new low is reached (b52) or 3 pushes to a HL.

A second leg trade (#4) may only take out the prior leg or it could give a large breakout. A channel type move such as today is more likely to reverse while a breakout is more likely to result in a sustained trend.

Friday, February 15, 2013

Large stop fading


In an earlier post, I spoke about the difficulties of fading moves with a fixed stop and how larger stops such as half the prior bar may be more appropriate. Today's results are preliminary, but show how such a move may be put into action.

My standard 10t stop would have been taken out for trades #2 and #3 but a larger stop above half the fade bar (i.e. 21t above 42t long b5 and 17t above 34t long b10). These stops are effectively twice as large as what I'm normally comfortable with and I would need to find a way to somehow make these smaller.

The good thing about this approach is that during hard trends such as the first few swings today, a larger stop is likely to pay off better while for a tight range, the stops are likely to be smaller giving an overall reasonable risk:reward ratio.

Thursday, February 14, 2013

The nature of experimentation


Almost any new insight requires observation and experimentation. Observation digs up potential patterns of price action that may be exploitable or simply points to things to avoid. Experimentation gives you objective data that allows you to select the best of these observations and rule out the rest.

In general, weak and mid-range opens (such as today) are best for experimentation. You should try not to experiment on days that are likely to trend and give a large profit. On smaller days, you can check patterns without an expectation of a large win or loss.

Some experimental goals can be:

Charts other than 5m chart: The first few trades of the day were placed on tick and volume charts. Turns out its harder than I expected. Or perhaps my mind has not yet adjusted to them for CL.

Targets and/or expected pullbacks: #5 and #6 confirmed a pullback once the price overshot the TCL.

Pattern Completion:  #8 was a trade that confirmed the TL break down to b20 and test of prior high at b37 does test the other end of the range (gives new LOD).

You would need to collect sufficient data (at least 40 samples) until you can plan a trade around it. A combination of a pattern and target by themselves do not guarantee its tradable. You would need to actually trade them to ensure your target is reached before you are stopped out.

Most observations are not tradable and most experiments fail, and therefore I generally disclose but don't explain them. However, once in a while, a very useful observation can give your edge a boost. And these little boosts change you into a profitable trader.